The video shows game menu system:
Menu UI:

First, I create a new level, menu in this new level.
I added a canvas panel; all content will be displayed within this panel. I inserted an image as the background, stretching it to fill the entire canvas panel, which means that when displayed, the image will fill the entire screen.
I have added three buttons and positioned them in the centre of the screen. These three buttons are all contained within the same vertical container, which means they are the same size and aligned.
I have added text boxes beneath each button to display text. I have also added a text box in the centre of the screen; this is the game’s title.
Three buttons blueprint:

I have added Blueprints to each of the three buttons. The Blueprint for the ‘Start Game’ button is designed so that when the player clicks the button, a level opens directly. I have entered the name of the initial room as the level name.
The concept behind the button blueprint for the game settings is as follows: when the player clicks the button, the blueprint is triggered; once triggered, the game settings panel appears on the screen.
The Blueprint logic for the “End Game” button is as follows: when the player clicks the button, the “Look at Image” event is triggered; when the Blueprint is triggered, the game closes.
Level Blueprint:

This is the blueprint for the Menu level. The idea behind the blueprint is that when the level begins, the blueprint is triggered, and once triggered, the contents of the Canvas panel (the start menu) are displayed on the screen.
Retrieve the player controller, display the mouse cursor on the screen, and allow the player to click.
Game setting UI:
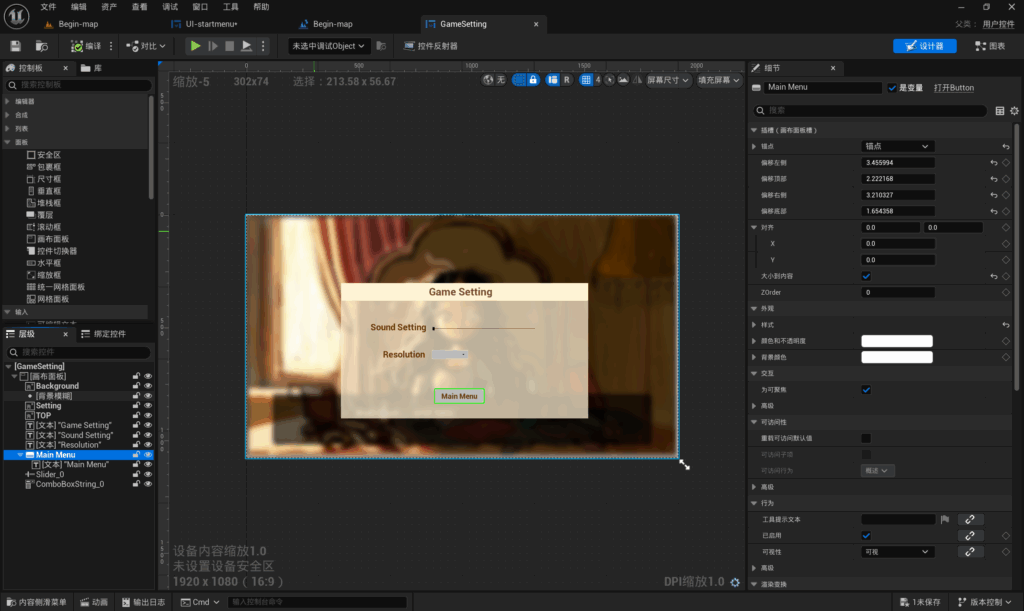
The approach to creating the game settings UI is as follows: first, create a canvas panel so that all content is displayed within it. I used the same background image and added a blur effect to it. I placed a blank image in the centre of the screen and reduced its opacity. I added three text boxes to the image, labelled ‘Game Settings’, ‘Sound Settings’ and ‘Resolution’.
I have added a slider next to the ‘Sound Settings’ text box, which players can adjust to control the settings. I have added a combo box next to the ‘Resolution’ text box, allowing players to select different options. A ‘Return to Main Menu’ button has been added below the image.
UI Blueprint:
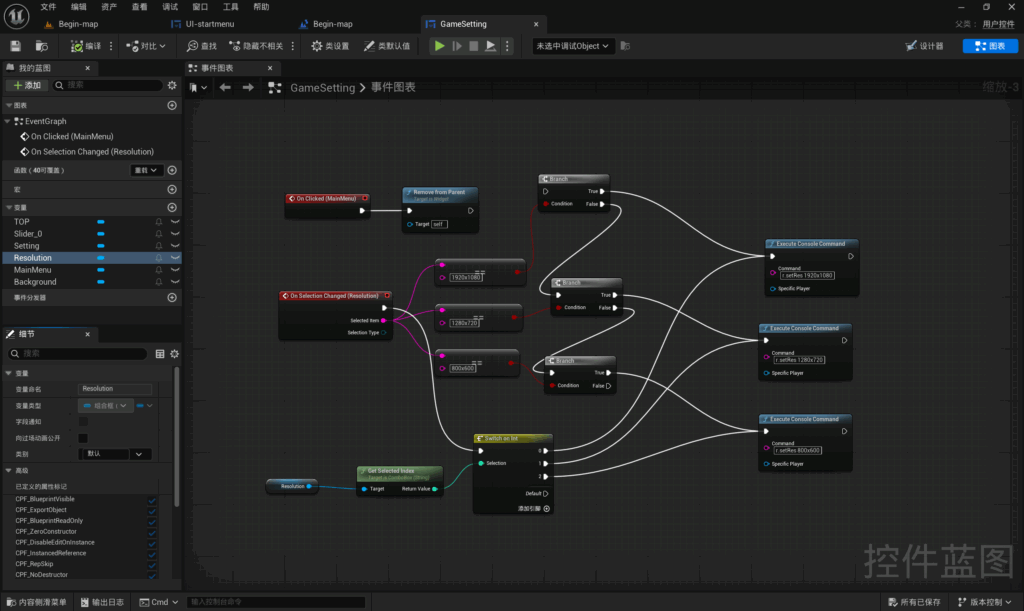
Blueprint logic for the ‘Return to Home’ button: The blueprint is triggered when the player clicks the button. Once triggered, the canvas panel is removed. This causes the main menu’s canvas panel to be displayed again.
The concept behind the ComboBoxstring blueprint: it is triggered when the player selects a different option. It retrieves the resolution variable; when the player selects a resolution, three different resolution options are displayed. If the condition matches the selected option, that option is triggered; if not, it moves on to the next option.
Leave a Reply